Scrambled eggs with tomatoes
Posted: August 7, 2013 Filed under: Eggs, Vegetables | Tags: Brunch, Eggs, Omelette, Tomato 1 Comment
This is supposed to be Northern China style scrambled eggs. Even though mobile calorie intake units friends were happy to eat it away, I cannot help but feel I didn’t make justice to the original Bill Granger’s recipe. I still blame the wok (or lack of it thereof) for a somehow odd texture. Mind you, this is far to be a total cooking failure. As heard over and over again – it all comes down to flavour… And indeed it was delicious. It is the satisfying, filling and healthy breakfast everyone is sort of expecting in a festive days. Or any other day, for that matter…
Scrambled eggs with tomatoes (adapted from Bill Granger‘s Easy)
Ingredients
- 6 large eggs
- 1 teaspoon Szechuan pepper ground with a mortar and pestle together with one teaspoon of salt
- salt and black pepper to taste
- 2 tablespoons light flavoured oil
- 6 spring onions, finely chopped
- 1 small garlic clove, crushed
- 3 medium tomatoes, cut into chunks
- 1 teaspoon sugar
Method
Start to making the Szechuan salt, by crushing the the peppers with a mortar and pestle together with a teaspoon of salt.
Whisk the eggs with a pinch of sea salt and freshly ground black pepper until smooth.
Heat 1 tablespoon of oil in a non-stick wok over medium-high heat. Add the egg mixture and swirl the pan on the heat for 30 seconds, or until browned around the edges, but still liquid in the center. Transfer to a large bowl.
Heat the remaining oil in the wok. Add the spring onion and the garlic. Stir fry for 30 seconds or until softened. Add the tomatoes and the sugar and cook, stirring occasionally, unit softened but still whole. Return the eggs to the wok and fold gently until set. Remove from the heat and leave to rest for a few seconds.
Sprinkle with the Szechuan salt. Serve with white boiled rice and green leafy vegetables.
Fennel orange salad with harissa dressing
Posted: August 2, 2013 Filed under: Fruit, Salad, Vegetarian | Tags: Fennel, Harrisa, Middle East, Nuts, Orange, Salad, The Hairy Dieters, Vegetarian 5 Comments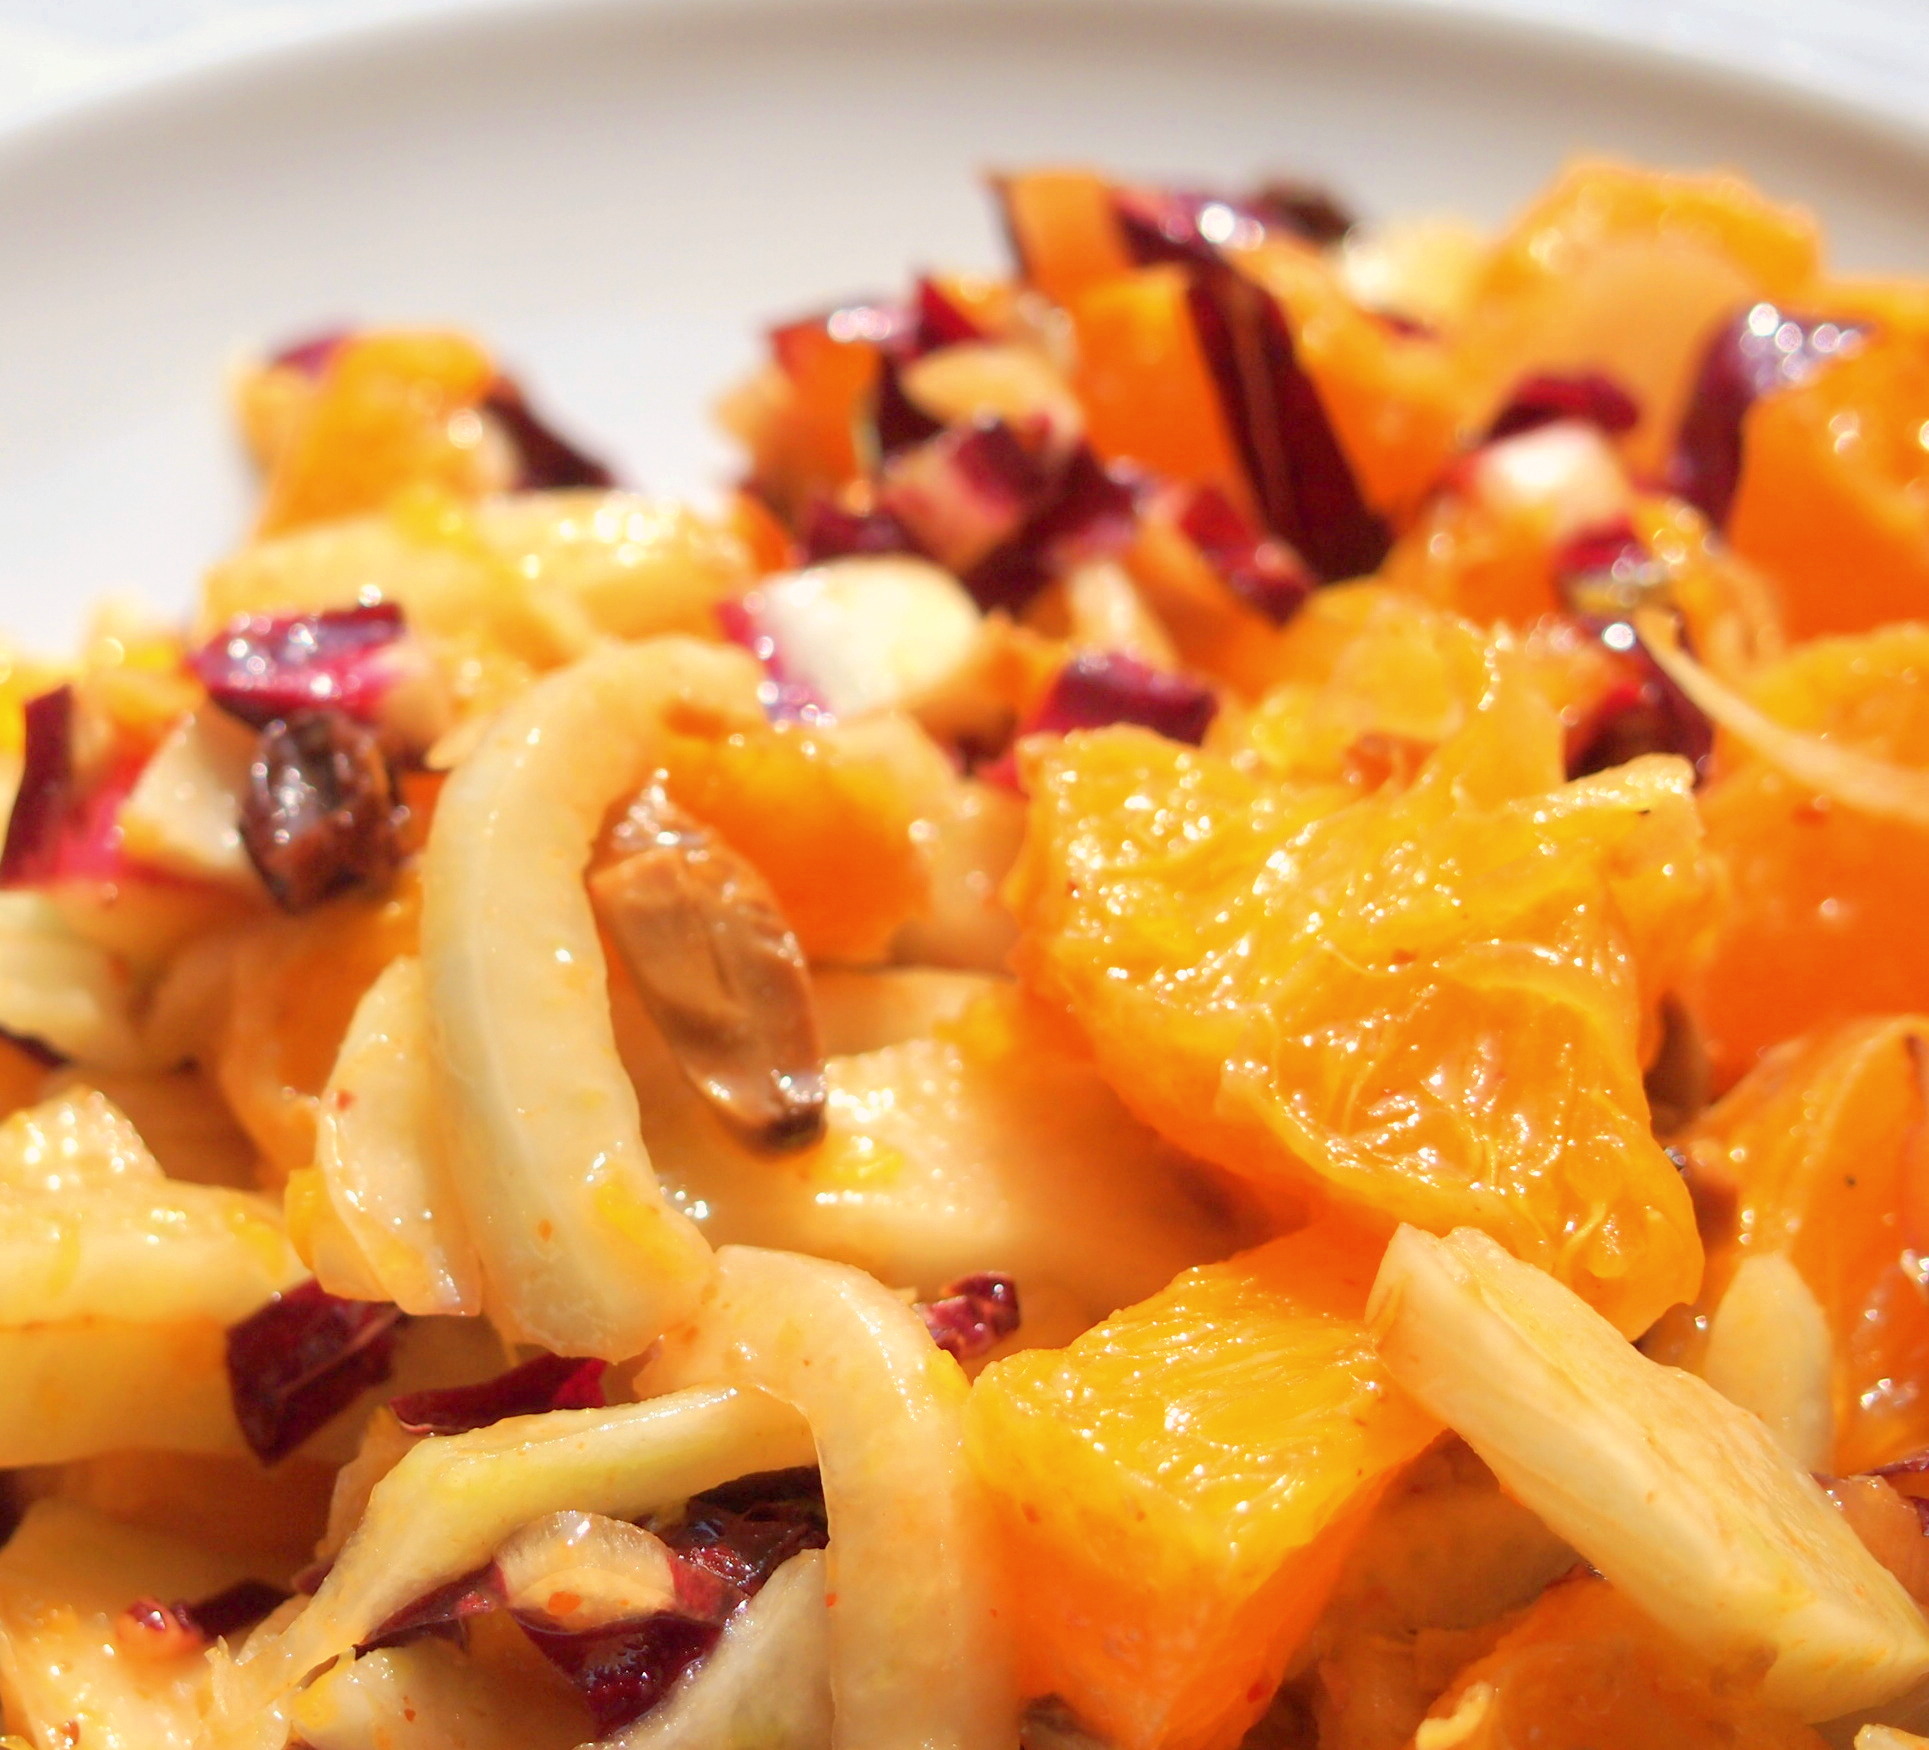
Every now and again, I find a dish that I like so much I do it over and over and over again. Like, for example, the Russian egg salad. Or, this cauliflower soup. And, let’s not even mention the whole #beetrootgate affair. This is one of those dishes, which has become one of the staples of last Winter (and Spring… and even Summer). It is just divine with smoked trout, baked salmon, cold cuts… And all this for less than 250 calories for a reasonable sized portion. Really, what not to like this salad?
Fennel orange salad with harissa dressing (adapted from Dave Myers and Si King’s The Hairy Dieters: How to Love Food and Lose Weight)
Ingredients
- 2 medium size fennel bulbs, trimmed, woody central core part removed and thinly sliced
- 2-3 oranges peeled (white parts out) and cut into 5cm chunks.
- 1/2 radicchio washed and thinly sliced (escarole or endive also will also works well)
- About 20 roasted salted almost slightly crushed with a mortar
- Handfull of raisins or sultanas (or a mix of both).
For the harissa dressing
- 1 tablespoon harissa
- 1 tablespoon honey
- 1 1/2 white wine vinegar
- 1 pinch ground coriander
- 3 tablespoons olive oil
- Freshly ground black pepper
Method
Place the sliced fennel in a salad bowl. Carefully remove the white bitter parts of the orange and slice the oranges to divide flesh sections. Add to the bowl Crush the roasted salted almonds with a mortar and tip in the bowl. Add the sliced radicchio In a small bowl whisk well the harissa, honey, coriander and white wine vinegar. Pour in the olive oil in a very thin stream (spoon by spoon), beating all the while. The sauce is ready when it you obtain a glossy, slightly thick mixture. Drizzle the harissa dressing over the salad and gently toss to combine. Serve immediately.
Sweet and sour chicken
Posted: July 26, 2013 Filed under: Chicken, Fruit | Tags: Asian flavours, Chicken, Fruit, Peppers, Pineapple, Sugar, The Hairy Dieters, Vinegar 2 Comments
This has become one of my favourite dishes to take work for lunch. It is easy to make, healthy and very convenient to eat. It is also comforting… It is probably miles away from the real thing, but it still tastes good enough to pass every foodie standard of deliciousness.
Sweet and sour chicken (adapted from Dave Myers and Si King’s The Hairy Dieters: How to Love Food and Lose Weight)
Ingredients
- 1 x 425g/15oz can pineapple chunks in natural juice
- 2 tbsp cornflour
- 2 tbsp dark soy sauce
- 2 tbsp white wine vinegar
- 2 tbsp soft light brown sugar
- 2 tbsp tomato ketchup
- ½ tsp dried chilli flakes
- 2 boneless, skinless chicken breasts
- 2 tbsp sunflower oil
- 1 medium onion, cut into 12 wedges
- 2 peppers, red, green, orange or yellow, deseeded and cut into chunks of about 3cm/1¼in
- 100g of Brazil nuts
- 2 garlic cloves, peeled and crushed
- 25g/1oz piece fresh root ginger, peeled and finely grated
- freshly ground black pepper
Method
To make the sauce, drain the pineapple in a sieve over a bowl and keep all the juice – you should have about 150ml/5fl oz. Put the cornflour in a large bowl and stir in three tablespoons of the pineapple juice to make a smooth paste. Add the remaining juice and 150ml/5fl oz water, then stir in the soy sauce, vinegar, sugar, ketchup and chilli flakes until thoroughly combined. Set aside.
Cut each chicken breast into eight or nine even pieces. Heat a tablespoon of the oil in a large non-stick frying pan or wok and stir-fry the onion and peppers for two minutes over a high heat. Drain the water chestnuts and cut them in half horizontally.
Add the remaining oil and the chicken to the pan and stir-fry for two minutes until coloured on all sides. Add the garlic, ginger, pineapple chunks and water chestnuts and stir-fry for 30–60 seconds.
Give the cornflour and pineapple mixture a good stir and add it to the pan with the chicken and vegetables. Stir well, season with some ground black pepper and bring to a simmer. Cook for 4–6 minutes until the sauce is thickened and glossy and the chicken is tender and cooked throughout, turning the chicken and vegetables a few times. Serve with a small portion of rice.
Chicken potpie
Posted: July 22, 2013 Filed under: Chicken, Pastry and Baking | Tags: Baking, Carrots, celery, Chicken, Dairy, Onions, Pastry, Pie, Potatoes, Thomas Keller Leave a comment
In short, this is such a good chicken pie, it is totally worthwhile to endure cooking process. It is arguably one of the best I have ever had. It is hard to believe this dish actually start from, God forgive, leftovers…
A few shortcuts, though: I used pre-made pastry. I know – home made pastry is not that hard to do. But, I didn’t feel brave enough for it… and, the one in the supermarket is also perfectly fine for this purpose… If you don’t have any chicken leftovers, and need to cook it from scratch, add some herbs and vegetables when boiling it (this recipe work just fine). Everything else is so tasty, it is a crying shame to put in some bland rubbery chicken.
Chicken potpie (adapted from Thomas Keller‘s Ad hoc at home)
Ingredients
2 sheets of basic pie pastry
Chicken Pie Filling
- 1 cup of potatoes cut in about 6cm pieces
- 1 1/4 of carrots cut diagonally in 6cm pieces
- 12 white pearl onions
- 3 bay leaves
- 3 thyme sprigs
- 24 black peppercorns
- 1 1/4 cups of 4-6cm of pieces of celery, cut on the diagonally
- 2 cups of shredded cooked chicken
Béchamel sauce
- 3 tablespoons of unsalted butter
- 3 tablespoons of all-purpose flour
- 3 cups of whole milk
- 1 salt and freshly ground black pepper, or to taste
- 1 tablespoon finely chopped flat-leaf parsley
- 1/2 teaspoon finely chopped thyme
- Pinch of cayenne
- 1 egg, beaten
Method
Roll out the dough and line the baking tray with one of the sheets. Put the other one a plate. Refrigerate both.
Place the potatoes, carrots and onions in a saucepan with the bay, thyme and peppercorns. Top with cold water to cover. Gently bring to a simmer. Cook until just tender, about 8-10min (the original recipe asked for each vegetable to cooked in individual pans, but I just put everything together in the same one). Once cooked, drain the water and discard bay, thyme, and peppercorns. Cut the onions in 2 and set aside to cool.
Blanch the celery for just over a minute in a large pot of boiling salted water, until they are tender/crispy. Drain and let it cool in a bowl of iced water. Set aside with the other vegetables
You can now start the béchamel. Melt the butter in a medium saucepan over medium heat. Whisk in the flour and cook for 2 to 3 minutes, adjusting the heat as needed so the mixture does not brown. Whisk in the milk, lower the heat to keep the bechamel at a gentle simmer, and cook, whisking ofter to ensure it doesn’t burn. It should take about 30-40minutes until the sauce has thickened and reduced to about 2 cups. Season to taste with salt, pepper, parsley, thyme, and cayenne.
Put the oven racks in the lower third and center of the oven and preheat the oven to 190 oC (about 375oF).
Remove the pastry sheets rom the refrigerator. Scatter the vegetables and chicken into the pie shell. Pour the béchamel over them. Moisten the rim of pie shell with some of the beaten egg. Cover the filling with the top crust and press the edges of the dough together to seal. Trim away the excess dough that overhangs the rim. Brush the top crust with the egg. Cut a small vent in the center of the dough with the tip of a paring knife to allow the steam to escape.
Bake on the lower oven rack until the crust is a rich golden brown, 50 minutes to 1 hour. If necessary, move the pie to the centre rack during the last 10 minutes of baking to brown the crust. On the other hand, if crust is browning too quickly, cover with aluminium foil.
Transfer to a cooling rack and let rest for 10 minutes.
The pork and prawn balls in aromatic broth cook off: Gordon Ramsay’s Ultimate Cookery Course
Posted: July 18, 2013 Filed under: Pork, Soup | Tags: Asian flavours, Ginger, Gordon Ramsay, minced meat, Pork, Prawm, Soup, spinash 3 Comments
Last time I tried pork and prawn balls, it was a mess… After that, I talked myself to never try this dish again and stick to the Asian restaurant around the corner for my prawn and pork fix. Then, I saw Gordon Ramsay cooking them on his Ultimate Cookery Course and I sort of changed my mind. As usual, a very brief list of ingredients and a method which looked foul proof – definitely something worthwhile trying. In fact, it is so easy to do it has become one dishes I do over and over again. In less than 30min, I have the balls ready to be eaten. To make it even more convenient, once fried, the balls keep in the fridge for a few days. All you have to worry about is get the stock going and in less than 10min, you have your freshly cooked dinner ready. For added valued, almost not fat and no carbohydrates in sight…
Pork and prawn balls in aromatic broth (adapted from Gordon Ramsay’s Ultimate Cookery Course)
Ingredients
For the balls
- 100g raw prawns, peeled, deveined and finely chopped until almost minced
- 250g minced pork
- 1½ tbsp finely chopped chives
- 1.5cm piece of fresh root ginger, peeled and diced
- Enough sunflower sun for pan frying the balls
- 2 big handfuls of spinach
- Sea salt and freshly ground black pepper
- 1 spring onion, trimmed and finely sliced, to garnish
For the aromatic broth
- 1L stock, home-made or from stock cubes
- 1 lemon grass stalk
- 2 whole star anise
- 2 teaspoon oyster sauce
- 2 teaspoon soy sauce
- 2cm piece of fresh root ginger, peeled and cut into matchsticks
Instructions
Place the minced shrimps in a bowl with the pork, chives and ginger. Season with a good pinch of salt and pepper and mix until the ingredients are well combined and sticking together. Roll the mixture into small balls about the size of a golf ball. Transfer to a plate, cover and chill until needed.
Meanwhile, get started on the broth. Heat the stock in a saucepan, add the other ingredients and mix well. Bring to the boil, lower the heat and gently simmer for 10 minutes to infuse, then taste and adjust the seasoning as necessary.
Heat a heavy-based frying pan over a medium heat and add a dash of oil. Fry the pork and prawn balls, turning frequently, for 6–7 minutes until golden brown all over. Transfer into the gently simmering pan of broth and leave to cook for 5 minutes until the balls are cooked through. Add the spinach and cook for 1 minute until just wilted.
Taste the dish and adjust the seasoning if necessary. Serve garnished with spring onions
The pork and prawns balls in aromatic broth cook off: The Hairy Dieter’s take
Posted: July 14, 2013 Filed under: Pasta, Pork, Soup | Tags: Asian flavours, Broth, minced meat, Pork, Shrimps, The Hairy Dieters, Vegetables Leave a comment
And another cook off: pork and prawns balls in aromatic broth. It is a bit of a foreign taste to my Mediterranean roots, but still delicious enough to me go back to it over and over again. Nothing that I would cook for myself, though. Never having cooked them before, the broths seem too complex and the flavours seem to be quite hard to get in the right proportions.
But, this Hairy Dieter’s version seemed achievable. A lot of work, but still, within my possibilities… Halfway through the process, there was a lot of huffing, puffing and fiddling around. Indeed it soon become a full blown mess, which included the mixer to go on strike to never work again. To make matters worse, it wasn’t as delicious as one would expect after all process. Well, maybe I haven’t “followed the recipe to the letter”, as The Hairy Dieter’s strong recommend, but after all this effort, I was somehow expecting something a bit more elevated… It is very unlikely I will try it again.
Pork and prawns balls in vegetables and noodles aromatic broth (adapted from Dave Myers and Si King’s The Hairy Dieters: How to Love Food and Lose Weight)
Ingredients
For the broth
- 2 liters chicken stock
- 2 lemongrass stalks
- 4 chillies (2 cut across, 2 deseed and thinly sliced)
- 6 kaffir lime leaves, dried or fresh
- 2 long shallots, thinly sliced
- 50g fresh root ginger, peeled and thinly sliced
- 4 garlic cloves, peeled and halved lengthways
- 4 tablespoons of fresh lime juice (1 1/2 limes)
- 3 tablespoons of Thai fish sauce
- 2 medium carrots peeled and cut to thin ribbons with a vegetable peeler
- 1 small red pepper, thinly sliced
- 1 small yellow pepper, thinly sliced
- 150 chestnut mushrooms
- 150 mangetout
- 50g fine vermicelli rice noodles
- large handfull of fresh coriander
For the pork and shrimp balls
- 250g lean minced pork
- 100g cooked peeled prawns, thawed if frozen
- 1/2 long shallot peeled and finely chopped
- 2 garlic cloves, finely chopped
- 1 chili, finely chopped
- 1 tablespoons of cornflour
- fine salt to taste
- 2 tablespoons of finely chopped fresh coriander leaves
Method
Start with the broth, pour the stock in a large saucepan. Bring to a simmer and add the lemongrass stalks. Split w of the chillies lengthways almost all the way through and pop them in the pan.
Add the lime leaves, half the sliced shallots and finally, all the ginger and garlic. Bring the broth to a low simmer and cook gently for 20min. Remove the pan from the heat and leave to stand for about 30min.
While waiting for the broth to cool down, start the balls. Put the minced pork and prawns in a large bowl. Add the chopped shallots, garlic, deseeded chilli, cornflour, salt and lots of freshly ground black pepper in food processor. Blend to make a tick, slightly textured purée. Add the coriander leaves and it another quick blitz until just combined. Take out the processor blade the roll the pork and prawn mixture into 20 small balls.
Strain the infused stock through a sieve into a clean pan. Stir in the remaining sliced shallot, lime juice and fish sauce. Stir in the remaining chillies, very finely chopped. Bring to a gentle simmer and add to the pork balls. Let it cook for 5 minutes, allowing the liquid to bubble gently. In the meanwhile, cut the carrots into large ribbons using a vegetable peeler. Deseed the peppers and slice them thinly; clean and slice the mushrooms. Trim the mangetout and cut them in half diagonally. Still the carrot strips, mushrooms, mange tout, peppers and noodles into the broth and let it simmer for 3-4min more, or until the pork balls are cooked through and the vegetables and noodles are just tender, stirring occasionally.
Ladle the broth into deep bowls and scatter the coriander on the top.
Beetroot and walnut hummus
Posted: July 11, 2013 Filed under: Snacks, Tapas, Vegetables, Vegetarian | Tags: Beetroot, Hugh Fearnley-Whittingstall, Nut, Spread, Tapas Leave a comment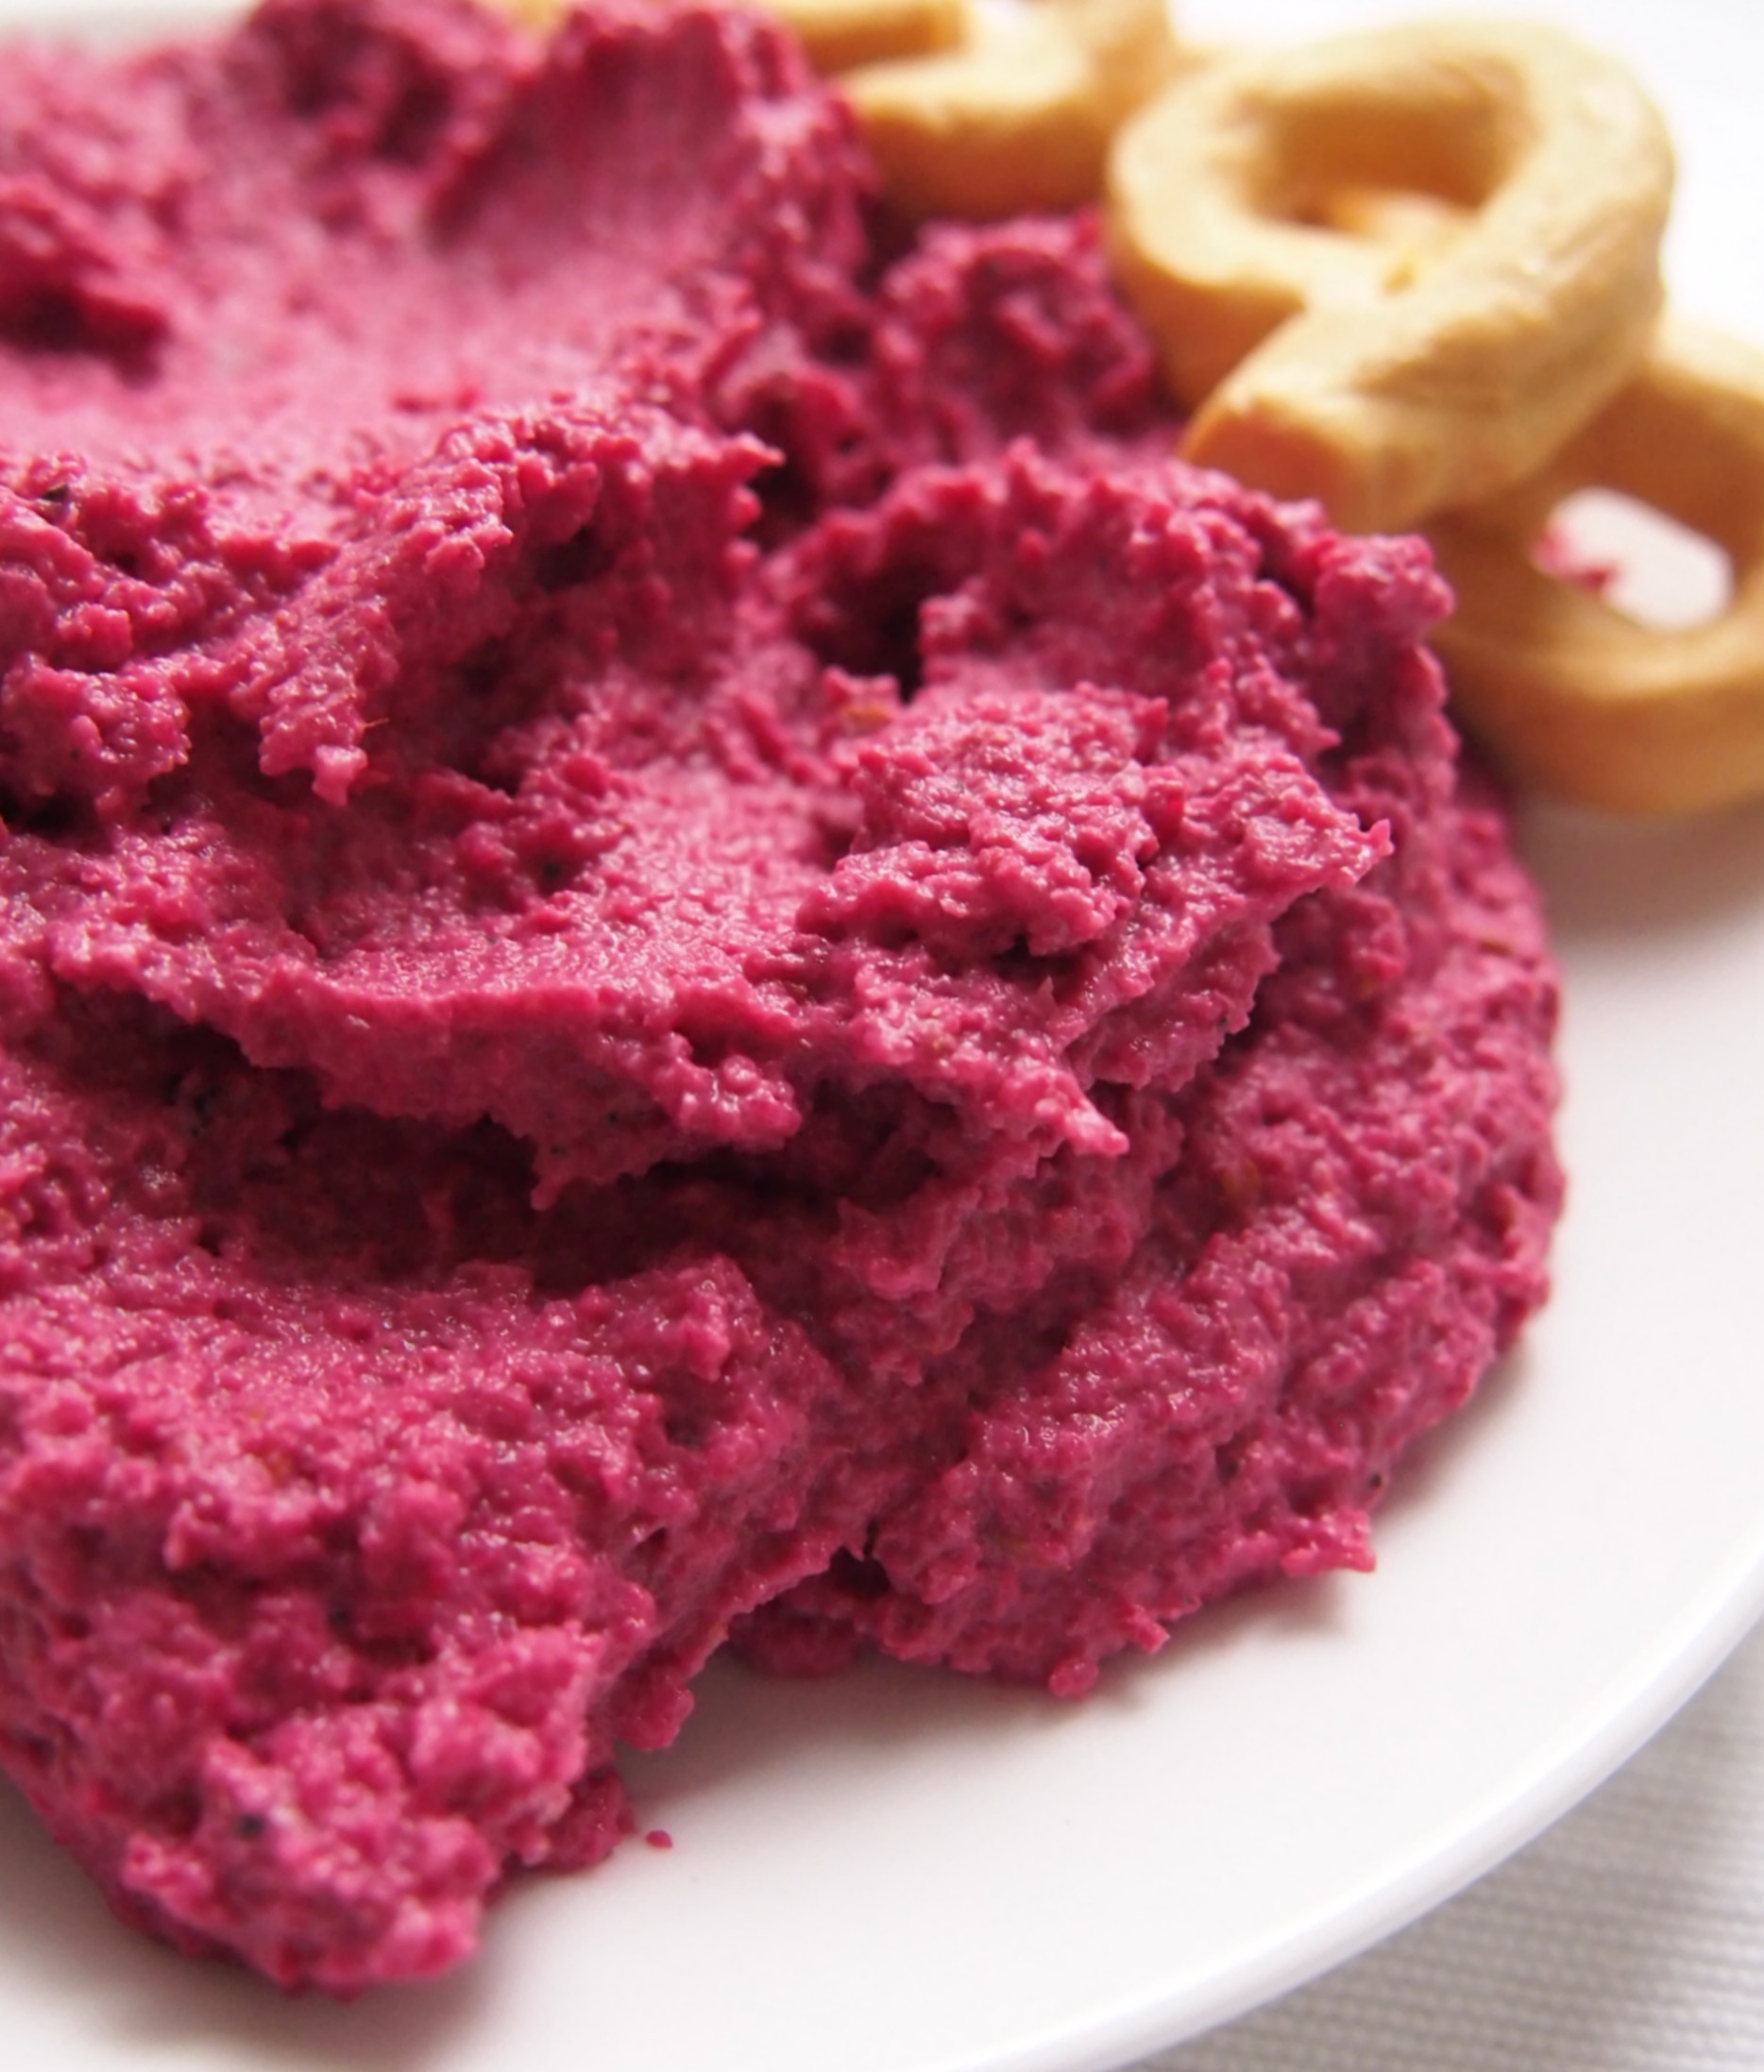
This #beetrootgate episode is long overdue… It has been almost a month I posted a beetroot dish, a spread turned into a creamy soup. Truth to be said, actually never managed to get the right consistency. After trying a couple of times, I ended up doing this beetroot and walnut hummus instead. Well, technically this isn’t exactly a hummus, as there are no chickpeas in this dish, but its colour and flavour compensate for this culinary liberty. It is a brilliant recipe, almost foolproof, with the earthy sweet flavour of the beetroot combining to perfection to the crunchy nuts and slightly tangy tahini. I had to hide it in the fridge before I ate it all, one spoon at a time.
Beetroot and walnut hummus (adapted from Hugh Fearnley-Whittingstall‘s River Cottage Every Day)
Ingredients
- 50g walnuts
- 1 tbsp cumin seeds
- 25g stale bread, crusts removed
- 200g cooked beetroot (not pickled), cut into cubes
- 1 tbsp tahini (sesame seed paste)
- 1 large garlic clove, crushed
- Juice of 1 lemon
- Sea salt and freshly ground black pepper
Method
Toast the walnuts in a stove at 180 oC for 5-7 minutes, until fragrant. Leave to cool.
In a small frying pan over a medium heat. Add the cumin seeds and dry-fry them, shaking the pan almost constantly to avoid burning, until they start to sizzle. Crush the seeds with a pestle and mortar or a spice grinder.
Break the bread into small chunks, put in a food processor or blender with the walnuts and blitz until fine. Add the beetroot, tahini, most of the garlic, a good pinch of the cumin, half the lemon juice, a little salt and a good grind of pepper, then blend to a thick paste.
Adjust it by adding a little more cumin, garlic, lemon, salt and/or pepper, blending again until you are happy with it. Loosen with a dash of oil if you think it needs it.
Serve at room temperature
PS – Cookies (Taralli Caserecci Pugliesi) courtesy of Coop Fine Food
Pork chops with sweet and sour red peppers
Posted: July 7, 2013 Filed under: Pork, Vegetables | Tags: Gordon Ramsay, Pork, Red onions, red peppers Leave a comment
After the blondies, another dish out from Gordon Ramsay’s Ultimate Cookery Course. Insort, three main ingredients to a delicious dish super easy to put together… All of a sudden, all these recipes with loads of cream, chorizo, stock seem a bit too baroque and convoluted. Tweaking a bit the methods you can also end up with a quasi-healthy dish. Meaning, using olive oil sparingly, skipping the butter and take out the fat from the chops. Well, sort of – or at least, this is want I want to believe because this combination is really outstanding.
Pork chops with red peppers (adapted from Gordon Ramsay’s Ultimate Cookery Course)
Ingredients
Pork chops
- 2 pork chops, about 200g each
- olive oil, for frying
- 2 garlic cloves, skin on, crushed
- small bunch of thyme
- butter
Sweet and Sour Peppers
- Olive oil, for frying
- 1 red onion, peeled and sliced
- 2 red peppers, deseeded and thinly sliced
- Sea salt and freshly ground black pepper
- 1 tbsp caster sugar
- 3 tbsp red wine vinegar
- 1 tbsp extra virgin olive oil
Method
First, prepare the peppers. Take a large frying pan and put enough olive oil to cover its bottom. Heat until piping hot and then add the onion and peppers. Season with salt and pepper, add the sugar and sauté over a high heat until soft and coloured.
Add the vinegar and let it bubble for a minute or two until it has reduced and the peppers are soft. Turn down the heat, add the tablespoon of extra virgin olive oil and cook for a further 2–3 minutes. Take the peppers out of the pan and set aside to infuse.
Wipe the pan clean, ready to cook the pork.
Using a sharp knife, make cuts into the fat of the chops, about 5mm deep and at 3–4cm intervals, making sure you don’t cut into the meat. (This will stop the meat from curling up during cooking and will make it cook more evenly.) Season the chops on both sides,
Place the cleaned-out frying pan over high heat and put enough oil to cover the bottom. Let it heat until piping hot and add the chops, garlic and thyme and fry for 2–3 minutes until coloured. Turn and fry for a further 2–3 minutes on the other side.
Towards the end of cooking time, add 3 knobs of butter. Let it cook for a while, pressing the fat again the sides of the pan to render the fat. Squeeze the garlic out of its skin and place with the herbs on top of the chops.
Transfer the chops to a plate, and rest for 5–10 minutes, spooning over the basting butter now and again. Serve the chops on top of the peppers with the resting juices.
Minted pea and feta scrambled eggs
Posted: July 3, 2013 Filed under: Eggs, Vegetarian | Tags: Brunch, Eggs, feta, Herbs, Peas, The Hairy Dieters Leave a comment
The day cannot go wrong if you have this for brunch – this is a real feel good dish. Mint and peas are one of the finest flavour combinations, and so is eggs and feta… And it feels like spring is right here.
Minted pea and feta scrambled eggs (adapted from Dave Myers and Si King’s The Hairy Dieters: How to Love Food and Lose Weight)
Ingredients
- 30g frozen peas
- 40g feta cheese, drained
- ½ tablespoon of dried min
- 3 medium eggs
- Oil olive to coat the bottom of a frying pan
- Salt and black pepper
Method
Cook the peas following the instructions in the package.
Mix the eggs with a whisker and season with salt and freshly ground pepper.
Put enough olive oil to coat the bottom a medium size frying pan, and place it over medium heat until it is piping hot.
Lower the heat and pour the eggs in the frying pan. When they begin to set, use a wooden spoon to draw the cooked eggs to the center. Do this several times until all the uncooked egg is set.
Scatter the peas and feta over the set eggs and cook for another 3 minutes until the feta starts to melt.
Transfer the scrambled eggs to a plate.
Savoury cookies with parlsey and tahini spread
Posted: June 30, 2013 Filed under: Pastry and Baking, Snacks, Tapas, Vegetarian | Tags: Cookies, Herbs, Snacks, Spread, Tahini, Tapas, Yotam Ottolenghi Leave a comment
B. was wondering what to do with a bottle of tahini he had sitting on his fridge. “What is this used for?”, he asked. “Oh, well, plenty of stuff like humus… and errrr… humus…. or even maybe carrot hummus, if you will“, I answered a bit mortified by the lack of options. Seriously, is tahini used just for hummus? After googling for a few minutes, it seems it also very popular in vegan cuisine, including lebanese inspired brownies (add beetroot for extra touch of healthiness), it is fundamental for baba ghanoush and the hero in all sorts of yoghurty-garlicky-herb-y dips. Like for example, this one I found in Jerusalem (but of course…). As a bonus, these savoury biscuits, a favourite of Yotam’s father. Totally addictive…
Savoury cookies with parsley and tahini spread (adapted from Yotam Ottolenghi and Sami Tamimi‘s Jerusalem)
Ingredients
Cookies
- 500g of plain flour sifted
- 100mL of sunflower oil
- 100 unsalted butter diced and left to soften
- 1 teaspoon of fast action dried yeast
- 1 teaspoon of baking powder
- 1 teaspoon sugar
- 1 1/2 teaspoon salt
- 1 1/2 teaspoon ground cumin
- 1 1/2 teaspoon fennel seeds toasted and very lightly crushed
- App 100mL of water
- 1 medium egg, whisked
- 2 teaspoon white (and black) sesame seeds
Dipping sauce
- 35g flat leaf parsley (stems and leaves)
- 1 garlic clove crushed
- 25g light tahini paste
- 125g Greek yoghurt (drained)
- 25mL lemon juice
- Pinch of salt
Method
Cookies
Preheat the oven to 200 oC. Place the sifted flour in a large bowl and make a well in the centre. Pour the oil into the well, add the butter, yeast, baking power, sugar, salt and the spices and stir together until the dough is formed. Add the water gradually while stirring until the dough is smooth. Knead for a couple of minutes.
Line a baking sheet with baking parchment. Divide the dough into small bowls, about 25g each. On a clean surface, roll the balls into long snakes, around 1cm thick and 12-15cm long. Make a closed out of each snake dough, and put on the parchment paper leaving a 2 cm distance between each of them. Brush each ring with the egg wash and sprinkle lightly with sesame seeds. Leave to prove for 30min.
Bake the biscuits in the oven for 22min, until golden brown. Allow to cool before storing. They will keep for 10days.
Dipping sauce
Blitz all the ingredients together to get a smooth, uniform green sauce you can use to coat the cookies. Add a bit more water if necessary.
